Showing posts with label halftone. Show all posts

Tuesday, October 14, 2008

Tools for Creating Halftones (Part 2)

My last post gave the basic instructions on how to create halftones - now it's time for a post about the tools used to create the different shapes, sizes, and effects halftones offer.

Tools for Halftones


1. The Gradient Tool.
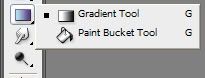


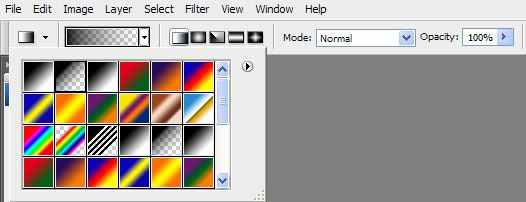
This is where a lot of halftones begin. Make sure the options are set up so that any gradient you make fades transparently, if you're working on a t-shirt design and need each layer to have a separate color.


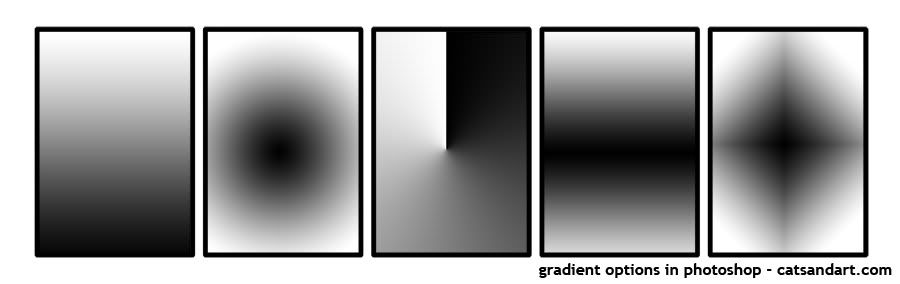
Photoshop has five different gradient shapes:


2. Photoshop Brushes

There are two standard brushes I use to create halftones, with a little editing in the brush options. The first one can be used with a mouse, and the second one is more tablet-centric:
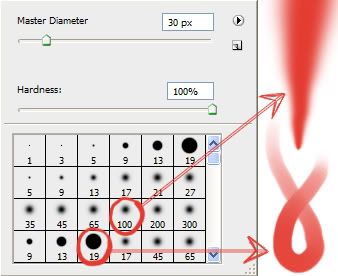


The first brush, size 100, is useful for shading in larger areas that don't necessarily work with a standard gradient. If you're using a tablet though, it might get too pointy at times. What I did was change the minimum diameter of the brush. Other times it might be too dark - but you can change that as well by selecting other dynamics in the brush editor.

To open up the brush editor, go to Window > Brushes.
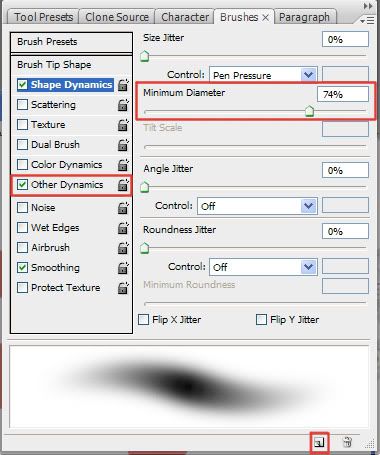


The second brush already changes opacity with pressure. If I need to shade with a little more detail, I lower the minimum diameter on that brush.

To save any changes you make to a brush, click the icon in the lower right hand side of the brush editor (highlighted in the screenshot above).


3. Selection Tools

This includes the Lasso Tool, Magic Wand, and everything underneath the "Select" portion of the menu. It is useful when creating custom halftones, because it can:

a) Limit the area you color in, especially when using big, fuzzy brushes - less clean-up time later.
b) Save previous selections you've made, so you don't have to redo them again and again.
c) Modify the selected area automatically.

The ones I use a lot in particular are:

Magic Wand - Sometimes I draw out a shape with a brush - such as a cloud, for instance - and instead of tracing over it with the lasso tool to color inside, I select it using the magic wand. Of course, this still leaves some of the background visible in between the color and the line, so I use the next tool in the list to fix that.

Select > Modify > Contract, Expand, and Feather. - Each of these has their uses when using an automatic way of making a selection.

- When I want to color inside of a whole design with a lot of details, I select the area around it. Then I go to Select > Inverse, which inverts the selection so that I can draw inside of the design. But, there is still a visible area outside of the line because of the way things are selected. So I go to Select > Modify > Contract, and choose the number of pixels based on how thick the lines are.

- On the flip side, when selecting a space from the inside, I use Select > Modify > Expand.

- Feather can help you create a gradient customized for a certian shape.

Select > Save Selection, Load Selection - Allows you to save selections you've made, which is really useful if you spent a lot of time selecting or tracing various parts of a design. If you end up having to re-do a section, just go to Select > Load Selection to bring it up.

-----

Confused? Part 3 is going to be a walkthrough on creating an actual design with halftones - all pictures and text in a jpeg so you can open it in Photoshop and read as you go along.

Monday, October 13, 2008

How to Make Halftones (Part 1)


Basic Procedure

E-mail me at hannahmariebear@gmail.com if you need help or if an instruction is unclear. I am working on a picture version.

1. Create a new file, with 300 pixels/inch resolution. On a new layer, make a colored gradient using the gradient tool.

2. Go to Image > Mode > Grayscale. Choose “Flatten.”

The three options it shows are Flatten, Cancel, and Don’t Flatten. ‘Flatten’ merges all layers and converts to greyscale, ‘Cancel’ does nothing, and ‘Don’t Flatten’ leaves the layers intact and proceeds to convert the file to grayscale. All layers must be flattened to create the halftone.

3. Press Ctrl+L to bring up the Levels options (this can also be found by going to Image > Adjustments > Levels).

A colored gradient will not have any solid areas after it is turned into a halftone, because it will be a shade of gray, initially. Halftones are created based on the lightness of the gray.

4. In the Levels box, slide the black arrow so it is just underneath where the graph starts.

Depending on which color you chose, this graph will look a lot different – but it always has a starting point. This makes the image dark enough to have solid color in the halftone just like the gradient.

5. Go to Image > Mode > Bitmap. Make sure the resolution is 300, and select “Halftone Screen” from the dropdown menu. Click “Ok.”

The resolution should be the same as the document you’re working on – otherwise you might end up with a halftone too small or too big for what you’re doing.

6. Experiment! Play with the numbers in the next box you see and just press Ctrl-Z to undo the change, and do step five again.

Frequency determines how large the dots are – lower numbers make the dots bigger, and higher numbers make the dots smaller. Angle determines which way the halftone points (enter a value between -180 to 180). I usually have mine set to 45 degrees. Shape refers to the actual shape of the halftone dots/lines.


Using the Halftone in Another Image

1. Go to Image > Mode > Grayscale. Leave the Size Ratio at 1.

Converting the image back to Greyscale mode gives you access to options that aren’t accessible in Bitmap mode. Size Ratio scales the image down with numbers larger than 1; 2 makes it smaller by 50 percent, etc.


2. Go to Select > Color Range. With the eyedropper tool, click on a black area in the halftone.

The preview image in color range should look like your halftone with inverted colors. Fuzziness refers to the range of colors that will get selected – a smaller number means less, a larger number means more. Bitmap converted everything to just black and white, so 1 will do here.


3. For colored halftones: Image > Mode > RGB Color. Create a new layer, fill with the paint bucket tool, then copy and paste into the destination file.

I find that this is easier to do than copying the black halftone into the working file and changing the color there.


Glossary

Angle - determines which way the halftone points (enter a value between -180 to 180).
Bitmap – turns images into purely black or white, with no grey or color.
Color range – makes a selection in Photoshop based on colors.
Don't flatten - leaves the layers intact and proceeds to convert the file to grayscale.
Flatten - merges all layers and converts to grayscale.
Frequency - determines how large the halftone dots are – lower numbers make the dots bigger, and higher numbers make the dots smaller.
Fuzziness - refers to the range of colors that will get selected in Color Range mode – a smaller number means less, a larger number means more.
Gradient tool – tool in Photoshop, usually bundled with the paint bucket tool, that creates a gradient in various shapes.
Grayscale – mode that converts color images into grey.
Levels – (shortcut: Ctrl-L) adjusts shadows, mid-tones, and highlights.
Paint bucket tool – fills a selected area with color.
Resolution – amount of detail in a bitmap image
Shape - the actual shape of the halftone dots/lines.
Size Ratio - scales a bitmap image down with numbers larger than 1; 2 makes it smaller by 50 percent, etc.